
No products in the cart.
10×10 Trade Show Booth Layout Ideas for Demos, Products and Conversations
A 10×10 trade show booth gives you 100 square feet, or approximately 9.29 square meters. The most useful layout is the one that supports your main activity while leaving room for visitors to take part. A product demonstration, a sample display and a seated discussion need different arrangements—even when the booth dimensions are identical.
Start your 10×10 trade show booth layout with a practical question: what should happen when a visitor steps inside? Build around that activity before selecting counters, screens or decorative panels.
Start with the real usable footprint
The rented footprint is not the same as the space available for people. Display bases, furniture, stored materials and staff all occupy part of it. A fabric backdrop may look slim from the front while its feet extend into the booth.
Ask for assembled dimensions, including feet, stabilizers and projecting accessories. Mark these on the plan. Then draw people where they will actually stand during a demonstration or conversation. This reveals problems that a furniture-only drawing can miss.
Layout 1: A demonstration station with room to watch
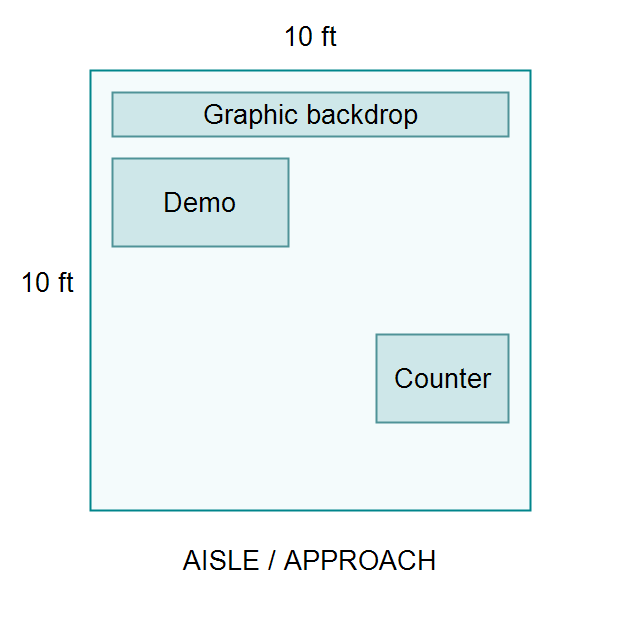
Use this arrangement when a visitor needs to see a process, handle a sample or follow a software demonstration. Put the demonstration surface toward the rear on one side, with the presenter beside it. Reserve the middle for the audience and keep the opposite side available for entry and exit.
For an initial planning exercise, divide the booth into a rear activity band about four feet deep and a front visitor band about six feet deep. These are adjustable zones, not prescribed clearances. The equipment footprint and actual user movements determine the final arrangement.
Place the screen so viewers face into the booth. If they must stand in the public aisle to watch, move the demonstration farther inward or reduce the audience size. For software, test the display with the actual interface: a screen that looks impressive in a rendering may show text too small to read from the viewing position.
Layout 2: Product browsing along the rear
For a small product range, arrange selected samples on shallow display units near the back. Put specifications beside the relevant item rather than asking visitors to match products to a separate list.
Keep replenishment stock out of the browsing area. A portable trade show counter can provide a writing surface and storage, but confirm its internal capacity before assigning everything to it. Shipping cartons, staff bags and packaging need a separate plan.
This layout suits a visitor who wants to compare items at their own pace. It is less suitable for a large demonstration audience: people inspecting samples can block the same area needed by viewers.
Layout 3: One focused consultation area
If the goal is a longer discussion, start with the meeting furniture and draw it in its occupied position. Chairs need more space when pulled out than when tucked under a table. A stool, coat or open storage door can narrow the remaining route.
Test whether someone can reach the discussion area while another visitor is already seated. If not, use a smaller furniture set or offer scheduled meetings elsewhere. A 10×10 booth can support conversation, but an enclosed meeting room, substantial storage and a full product gallery will compete for the same floor.
Choose the display after the activity
A tension fabric display stand can provide a graphic background; a compatible illuminated display can add a different visual effect. Neither choice solves an overcrowded floor plan. First confirm where people fit, then select the structure, graphics and lighting that support that plan.
For a small trade show booth solution intended for repeated events, also ask how the display packs, which parts require tools and whether the same components can support another layout. Treat those as product-specific questions.
Before you approve the plan
Tape out the footprint and furniture at full size. Rehearse the visitor interaction with staff, samples and bags present. Check the view from the aisle, the route to the main activity and access to storage. Confirm the event's display requirements before ordering graphics or hardware.
Frequently asked questions
Can a 10×10 booth include seating? Yes, if seating supports the main objective. Test occupied chairs and visitor movement together before committing to the furniture.
How many staff should work inside? Begin with the roles you need, then rehearse them in the marked footprint. Add staff only if visitors still have comfortable room to participate.
Can I reuse a 10×10 display in a larger booth? Possibly. Ask the supplier which frames, connectors, graphics and bases are compatible with the larger configuration.
Share your footprint, open sides and main visitor activity with QuicklyShow to discuss a portable booth configuration for your next event.
